
Photos speak before we do. The way you’re framed and how much of your body is shown can change how people feel about the image.
A 1/4 shot focuses on your face. A 1/2 shows more personality. A 3/4 body shot balances detail and posture. Additionally, a full-body shot gives the full view.
Each one has its place, maybe you’re building your brand, applying for a job, or enhancing your online presence. In this blog, we’ll explain what these shots are, when to use them, tips and the most common mistakes to avoid.
Want your photos to tell the right story? Let’s make sure you’re using the best shot for it.
Types of Body Shots: A Quick Overview
Not every photo needs to show the same amount of your body. Each type of shot has its own purpose. Here’s a quick look at the most common ones and when to use them.
3/4 Body Shot
A 3/4 body shot shows you from your head down to just below your knees. It gives a balanced look at your face, upper body, and how you stand. This makes it a smart choice for photos that need to show both style and personality.
Used in cases:
- Modeling portfolios
- Business profile photos
- Personal websites and branding pages
- Social media bios for professionals or creators
Half-Body Shot
A half-body shot frames you from the top of your head to your waist or hips. It focuses on your facial expression and upper body. This type of photo works well when the main goal is to highlight your face and how you present yourself.
Used in cases:
- Profile pictures for work or school
- Speaking events or press features
- Social media headshots
- Team or company staff pages
Full-Body Shot
A full-body shot includes your entire body from head to toe. It shows your full posture, outfit, and overall presence. This shot is useful when you want to give a complete view of how you look or move.
Used in cases:
- Fashion and fitness portfolios
- Online shopping models
- Actor or performer profiles
- Full-length portraits for casual or pro use
How to Take a 3/4 Body Shot
Taking a good 3/4 body shot doesn’t have to be hard. You just need the righ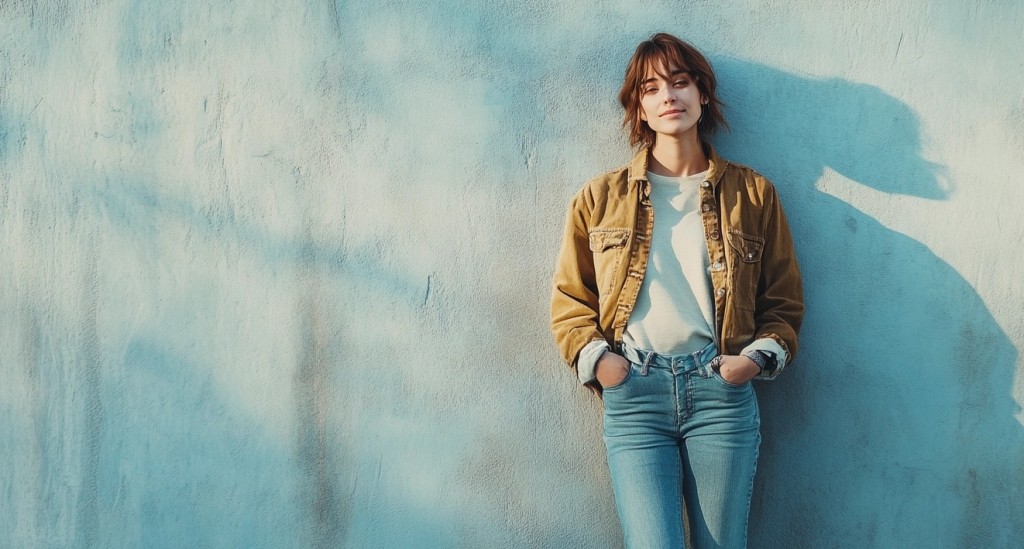 t setup and a bit of care.
First, stand straight but stay relaxed. Don’t lock your arms or knees. You should look natural, not stiff. The camera should show you from your head to just below your knees.
Face the camera straight on, or turn your shoulders a little to the side. This adds more shape and makes the photo look better. Keep your chin up and eyes open. A small smile helps, too.
Use soft, even lighting. Natural light from a window works well. If you’re outside, try early morning or late afternoon when the light is softer. Avoid bright light right above your head.
Pick a simple background. You want the focus to stay on you, not on what’s behind you. Plain walls, trees, or solid-colored backdrops are all good choices.
Hold the camera a few feet back and at about chest or waist height. This keeps the shot balanced.
Most of all, stay calm. A relaxed face and body always look better than one that feels forced or too planned.
Take a few shots and pick the best one!
When to Choose a 3/4 Shot
A 3/4 body shot is one of the most useful types of photos. It shows more than just your face but doesn’t go all the way down to your feet. This makes it a strong middle ground.
You should choose a 3/4 shot when you want to show your personality, posture, and style—all in one photo.
It’s great for:
- Modeling profiles
- Business websites or job applications
- Press kits or speaker pages
- Social media for creators and influencers
This shot works well when you need to look confident but also friendly. It shows enough of your body to give off the right vibe, without going too far or feeling too close.
It’s also a good pick if you’re showing off part of an outfit or want people to notice how you stand or carry yourself.
If you’re unsure which type to use, the 3/4 body shot is often the safest and most flexible choice. It fits into many settings and gives you a solid, well-rounded look.
Photography Tips for These Types of Body Shots
Good photos aren’t just about posing—they’re about setting things up the right way. No matter which body shot you’re taking, these tips can help.
1. Use Natural Light: Natural light is soft and easy to work with. Stand near a window or go outside when the sun isn’t too strong—early morning or late afternoon is best. Bright noon sun can make strong shadows.
2. Keep the Background Simple: The focus should be on you. Choose a clean background with little to no clutter. Walls, trees, or plain streets work well. Messy or busy backgrounds can take away attention.
3. Frame It Right: For a 3/4 shot, show from your head to just below your knees. For a half-body shot, show from your head to your waist. For a full-body shot, make sure your whole body fits with some space around you.
4. Camera Height Matters: The camera should be about chest or waist level for a balanced view. Don’t shoot from too high or too low unless that’s the look you want.
5. Stay Relaxed: The best photos happen when you feel calm. Take deep breaths, shake off tension, and try not to overthink it.
Take your time. Try different angles. Pick the one that feels most like you.
Common Mistakes to Avoid
Even with a good camera and outfit, small mistakes can ruin a photo. Here are the big ones to watch out for:
Positioning Errors
The way you stand matters a lot. If your body is stiff or twisted in a weird way, the photo can feel off. Crossing your arms too tightly or standing too straight can make you look nervous or closed off.
Standing too close or too far from the camera also changes how your body looks. It can make your head seem too big or your legs too short.
How to fix it:
- Stand up straight but stay loose.
- Keep your shoulders relaxed.
- Turn a little to the side for a better shape.
- Make sure your full body (for the shot you want) fits in the frame.
Lighting Blunders
Bad lighting is a common problem. Harsh light from above can make shadows under your eyes. Light from behind can turn you into a dark shape. Both can make your photo look flat or unclear.
How to fix it:
- Use soft light from the front or side.
- Natural light from a window is great.
- If outdoors, avoid bright sunlight—try early morning or evening.
- Never stand with the light directly behind you unless you’re going for a silhouette.
Conclusion
Knowing how to use different body shots, like the 3/4 body shot, can really improve the quality of your photos.
Try out each kind and see what feels right for different situations. Now that you understand the basics, you’re ready to take better, more useful photos.
Remember, the 3/4 body shot is great when you want a mix of style, posture, and personality in one frame.
Want more easy-to-follow photo tips? Check out our other blogs, and keep learning new ways to improve your pictures.

Leave a Reply