Blurry photos can ruin a great moment. Lens calibration is the answer!
You think everything looks fine through the viewfinder, but the result? Soft, out-of-focus images that don’t match what you saw.
That’s often because your lens and camera aren’t quite on the same page. Lens calibration helps fix that. It’s a simple step that can make a big difference in how sharp your photos turn out.
If your shots aren’t as crisp as you want them to be, this could be the key to fixing it. Let’s figure it out together.
What is Lens Calibration?
Lens calibration is the process of adjusting your camera and lens so they focus accurately on the subject you choose.
Sometimes, even when everything looks right through the viewfinder, your photos come out a little blurry. This can happen if the focus point is off by just a small amount, either in front of or behind your subject. Calibration helps fix that.
It fine-tunes the focus system, ensuring that what you see is what you get in the final image. This is especially helpful for portrait, macro, or fast-moving shots where sharp focus really matters. It also improves overall photo sharpness and quality.
How to Calibrate Your Lens at Home (DIY)
You don’t always need a pro or fancy gear to fix focus problems. You can calibrate your lens at home with just a few simple tools and a bit of time. Here’s how to do it.
Tools You’ll Need
Before you start, grab these items:
- A tripod (to keep your camera still)
- A ruler or measuring tape (to check focus distance)
- A calibration chart (you can print one for free or buy one online)
Free or paid chart options:
- Free: Print from sites like Focus Pyramid, Photo.net, or the LensAlign Lite PDF.
- Paid: SpyderLensCal, LensAlign MkII, and Reikan FoCal (some even offer apps with step-by-step help)
Some apps like FoCal even connect to your computer and guide you through the process. But you can still get great results with just the basics.
Steps for the Calibration Process
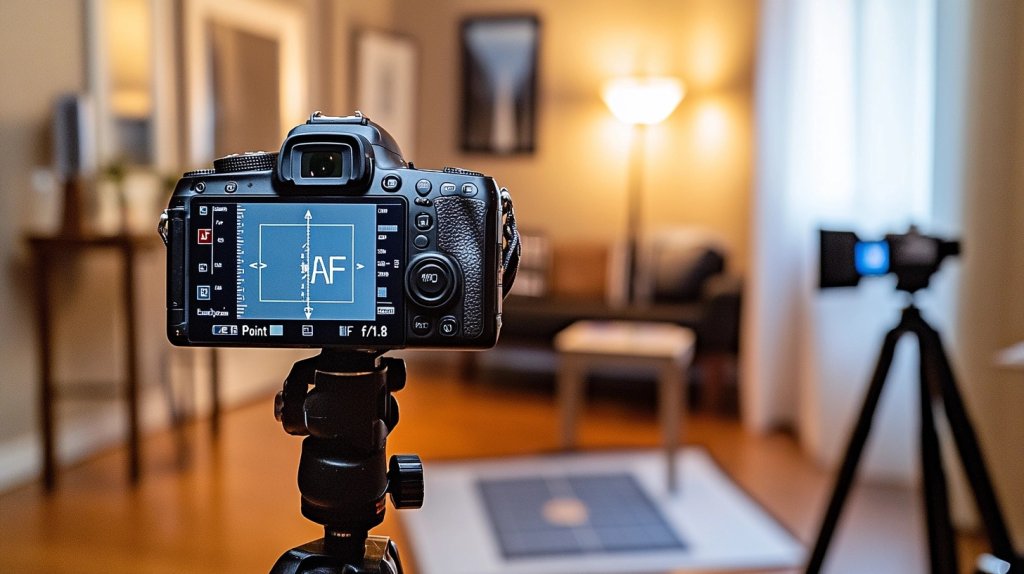
- Set up your camera and chart: Mount your camera on a tripod. Place the calibration chart at the same height as your camera, around 5–10 feet away. Use good lighting.
- Use your camera’s widest aperture: This means using the lowest f-number, like f/1.8 or f/2.8. This gives the shallowest depth of field, making it easier to see focus issues.
- Take a test photo: Use single-point autofocus. Focus right on the center of the chart.
- Check your image: Zoom in on the photo. Is the center sharp? Or is the sharp part in front of or behind the target?
- Make adjustments: Go to your camera’s AF Microadjustment or AF Fine-Tune settings. Adjust the focus forward or backward based on what you saw.
- Retake the photo: Repeat the steps until the center of the chart is the sharpest point.
Brand tips:
- Canon: Go to AF Microadjustment in the settings.
- Nikon: Look for AF Fine Tune in the menu.
- Sony: Use AF Micro Adj (in some models, it’s only for certain lenses).
Some mirrorless cameras (like Sony and Canon RF) don’t need calibration as much, but older DSLR lenses often do.
Interpreting Your Results
After you take your test shots, it’s time to see if your adjustments worked. Look closely at the photo you took of the calibration chart.
The part you focused on—usually the center—should be the sharpest area in the image. If the sharpest spot is in front of that point, your lens is front focusing. If the sharpest spot is behind it, your lens is back-focusing.
In that case, go into your camera’s settings and make a small adjustment using the AF microadjustment (or fine-tune) feature. Change the setting a little at a time, then take another photo to check. Keep repeating this until the center of your target is perfectly sharp.
This back-and-forth may take a few tries, but don’t rush. Getting it just right means your camera and lens will work better together, giving you clearer, more accurate photos in the future.
Getting your lens calibrated might take a little time, but it’s worth it. You’ll start seeing sharper photos, better details, and fewer missed shots. Up next, let’s look at how often you should check and recalibrate your lens to keep it working great.
Why Lens Calibration is Important
Lens calibration is a key step in making sure your camera and lens work well together. Even if you have a high-quality camera, you might still get blurry photos because the focus is a little off.
This can happen when your lens focuses slightly in front of or behind your subject. That’s called front or back focus. It’s a common issue, especially with certain camera and lens combinations.
When the focus isn’t spot-on, important parts of your photo, like someone’s eyes, can look soft, while something behind or in front of them looks sharp. That’s not what you want.
Calibrating your lens fixes this by adjusting the way your camera focuses. It helps your lens hit the right spot every time, giving you much sharper and more detailed images.
You’ll notice the difference, especially when shooting close-ups, portraits, or anything that needs perfect focus. It also helps you make the most of the gear you already own.
Instead of replacing a lens or buying new tools, calibration can bring out the full potential of what you have. It saves time, cuts down on blurry shots, and helps your photos look clean and clear—just the way you pictured them in your head.
Popular Calibration Tools
Before choosing a lens calibration method, it helps to compare the most common tools side by side. Each has its own strengths, depending on how often you shoot and how accurate you want your results to be.
| Tool | Features | Pros | Cons | Best For |
|---|---|---|---|---|
| Reikan FoCal | Software that tests focus, suggests settings, and keeps records | Fast, automatic, accurate, and good tracking | Needs a computer, only works with certain cameras | Serious users who want detailed results |
| SpyderLensCal | Physical focus chart with ruler, no software needed | Easy to use, portable, no batteries, good for most users | Manual process, no tracking or auto help | DIY users who want a reliable physical tool |
| Free Tools | Printable focus charts and DIY setups found online | Free, easy to access, good for learning | Takes more time, less accurate, no feedback or records | Beginners or casual shooters |
| Paid Tools | Store-bought tools with better design, features, and accuracy | Faster results, clearer feedback, and better build | Some need computers or extra setup time | Frequent shooters or those with many lenses |
No matter which tool you choose, the most important thing is that it helps your photos turn out clearer and sharper. Pick what fits your style, your gear, and how hands-on you want the process to be.
Brand-Specific Calibration Tips
Each camera brand has its own name and steps for focus calibration. Knowing where to find the settings on your camera makes the process a lot easier. Here’s how to do it based on what you use.
Canon Cameras
Canon calls this setting AF Microadjustment. It lets you fine-tune how your lens focuses.
- Go to your camera’s Menu.
- Look for AF Microadjustment (usually under the custom functions or setup tabs).
- Turn it On.
- You can then adjust the focus forward or backward using small numbers.
- Save the settings for each lens.
Some Canon cameras even let you save settings for different zoom ranges on the same lens (wide and telephoto).
Nikon Cameras
Nikon calls this setting AF Fine Tune. It works a lot like Canon’s version.
- Press the Menu button.
- Scroll to the Setup Menu.
- Find AF Fine Tune and switch it on.
- Use the adjustment scale to move the focus forward or backward.
- You can save custom settings for each lens you own.
Some Nikon DSLRs also let you name each lens for easier tracking.
Sony and Other Brands
Sony calls it AF Micro Adj on certain older DSLR and SLT models. Newer mirrorless cameras usually don’t need it as often, but here’s what to do if it’s available:
- Open the Menu.
- Look for AF Micro Adj (under the Setup or AF settings).
- Turn it on, then move the focus slightly forward or backward.
If you’re using a different brand (like Pentax or Olympus), check your camera manual or settings menu. Many DSLRs have similar options for lens fine-tuning, even if the names are a little different.
How Often Should You Calibrate?
You don’t need to calibrate your lens all the time. In general, once every few months is enough for most people. But there are times when it’s smart to check again. If you drop your camera, buy a new lens, or notice your photos looking a little soft, it’s a good idea to recalibrate.
Also, if you switch between indoor and outdoor shooting often, slight changes in focus can happen. Any time your gear feels “off,” take a few test shots. It’s a quick way to make sure everything is still working as it should.
Common Myths and Mistakes
1. “Every lens needs calibration” – Not always true
Many newer mirrorless cameras don’t need manual calibration because they use a different focusing system. Also, some lenses already work perfectly with certain cameras right out of the box. Always test first before adjusting anything.
2. DIY gone wrong (what to avoid)
- Bad lighting: Poor light makes it hard to see if the focus is sharp or not. Always use bright, even lighting.
- Wrong angle: The camera and chart should be level and straight. A tilted setup can throw off your results.
- Using the wrong part of the chart: Always focus on the center point of the target.
- Too far or too close: Stay within the right distance—usually around 5 to 10 feet, depending on your lens.
- Skipping test shots: Always take a few photos before and after making changes. That way, you can see if it’s working.
Conclusion
Lens calibration helps you get the sharp, clear photos your camera is meant to take.
Now that you know how it works and how to do it at home, take a little time to check your own gear. A quick adjustment can make a big difference in your shots. You don’t need fancy tools—just patience and good lighting.
Remember, not every lens needs fixing, but it’s always worth testing. Keeping your camera and lens in sync saves you time and frustration later.
Want to keep learning? Check out our other blogs for more simple tips to help you take better photos.

Leave a Reply