Have you ever taken a photo that turned out way too dark or super bright, and you weren’t sure why? That’s where EV, or Exposure Value, comes in.
It might sound a little tricky at first, but don’t worry, I’m here to make it super easy to understand.
I’ll explain what EV means in photography, how it affects your pictures, and how you can use it to get better shots.
You’ll learn what those little +1 or -2 numbers on your camera really do, and when to use them.
Whether you’re using a phone, a beginner camera, or something more advanced, this guide will help you feel more confident.
We’ll also look at simple tips, tools, and examples so you can practice right away. No confusing stuff- just clear steps and helpful advice.
By the end, you’ll know exactly how to use EV to fix brightness problems and make your photos look just right. Let’s get started and take the guesswork out of getting great shots!
What Does EV Mean in Photography?
EV stands for Exposure Value. It’s a number that helps you understand how bright or dark a photo will be. Think of it like a brightness setting for your camera.
When you change the EV, you’re telling the camera to let in more or less light.
If your photo looks too dark, you can raise the EV (like +1 or +2) to make it brighter.
If it’s too bright, lower the EV (like -1 or -2) to make it darker.
Cameras decide how much light to use by looking at the scene. But sometimes, they get it wrong-like when you’re shooting in snow or bright sunlight. That’s when changing the EV helps.
You don’t need to be a pro to use EV. Just remember: higher numbers = brighter photos, and lower numbers = darker photos.
Using EV the right way helps you take better pictures, even in tricky light!
Why Does EV Matter?

EV, or Exposure Value, matters because it helps your photos look just right, not too bright or too dark.
Sometimes, your camera might get confused by tricky lighting, like a bright sky or a shadowy room. That’s where EV comes in handy.
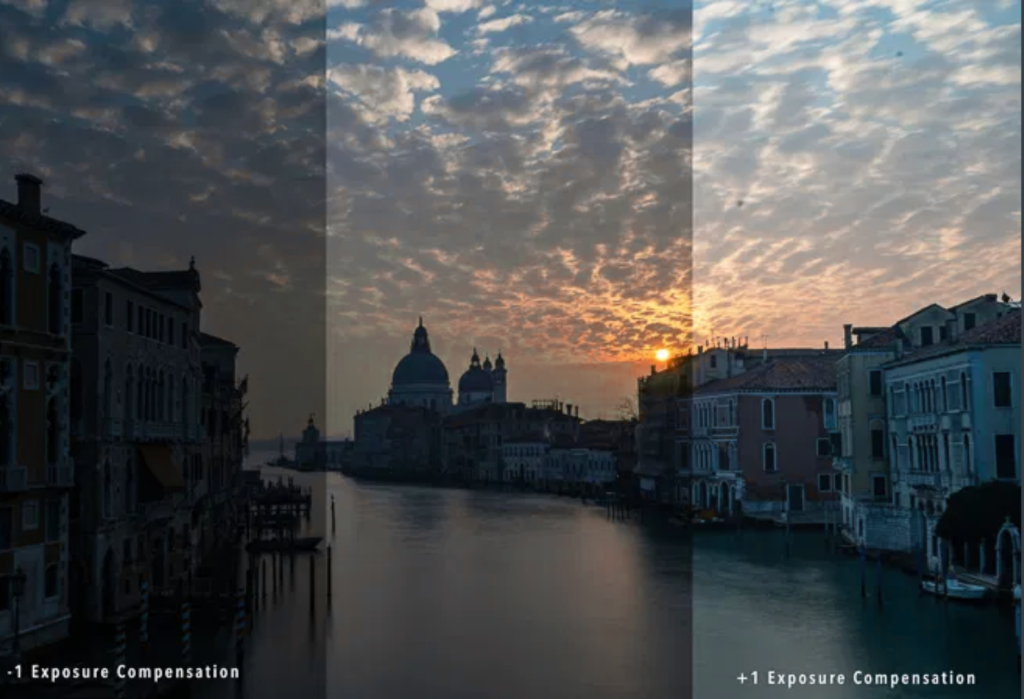
By changing the EV setting, you can fix the brightness before you even take the photo. Want a sunny scene to look less washed out? Lower the EV.
Want a face in the shade to show up better? Raise the EV.
It’s a simple tool that gives you more control over how your pictures turn out.
You don’t need fancy gear or expert skills- just learn when to adjust the number up or down.
Once you try it, you’ll see how EV makes your photos look more balanced and beautiful, no matter where you are.
How Does EV Work with Camera Settings?
Exposure Value (EV) connects directly to the three main parts of the exposure triangle: shutter speed, aperture, and ISO.
These three settings work together to control how much light enters your camera.
- Shutter speed decides how long the camera’s sensor is exposed to light.
- Aperture (f-number) controls how wide the lens opens.
- ISO changes how sensitive your camera is to light.
When you adjust any of these settings, your EV changes too.
If your camera or phone lets you manually change EV, it’s often shown as “+” or “–” numbers (like EV +1 or EV –2).
Increasing the EV makes the photo darker, and lowering the EV makes it brighter.
EV helps you understand how all these settings affect your photo’s brightness. Learning how EV works makes it easier to take better pictures, no matter what kind of camera you use!
How to Calculate EV
EV (Exposure Value) helps you understand how much light your camera lets in. A higher EV means less light, while a lower EV means more light.
You can figure out EV in two simple ways: using a formula or with an easy-to-read chart.
1. Simple EV Formula:
EV=log2(N^2)\t
-
N = f-number (aperture)
-
t = shutter speed in seconds
This tells you how bright or dark your photo will be with your settings. But don’t worry – you don’t have to do the math by hand.
Many free EV calculators online can do it for you!
2. Using an EV Chart
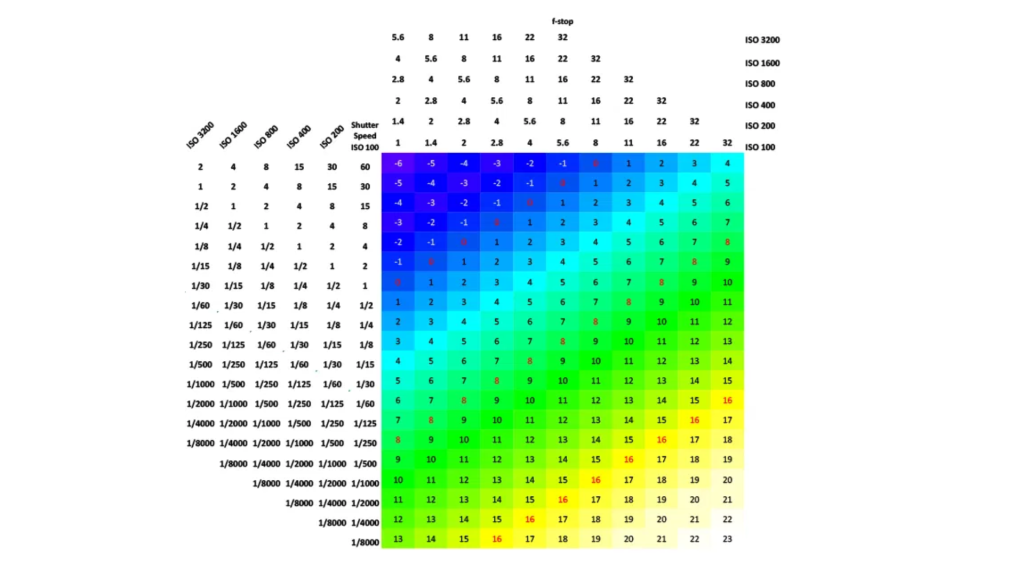
Most beginners like using an EV chart because it’s quick and easy.
EV charts show you pairs of aperture (f-number) and shutter speed that give you the same brightness in your photo.
Instead of doing math, you just look at the chart to match settings that balance light the same way.
Here’s an example:
-
f/4 at 1/250 sec = EV 12
-
f/8 at 1/60 sec = EV 12
Even though the numbers are different, they let in the same amount of light. That means your photo will look just as bright either way!
This is super helpful when you want to change your settings for style, like a blurrier background, but still want the same exposure.
Same EV, same brightness – just different settings!
Example EV Settings for Common Scenes
Knowing the EV (Exposure Value) for different scenes can help you choose the right settings on your camera. Here are some easy examples to guide you:
| Scene | Typical EV Value |
|---|---|
| Portrait on a sunny day | EV 15 |
| Indoor room without flash | EV 5 |
| Night street photo | EV 2 or lower |
These EV values help you guess how bright the scene is. On a sunny day, you need less light from the camera (higher EV).
At night, your camera needs to gather more light (lower EV). Using this chart makes it easier to pick the right settings, especially if you’re just starting out.
Practice Tips for Learning EV
Want to get better at using EV in your photography? Here are a few simple ways to practice:
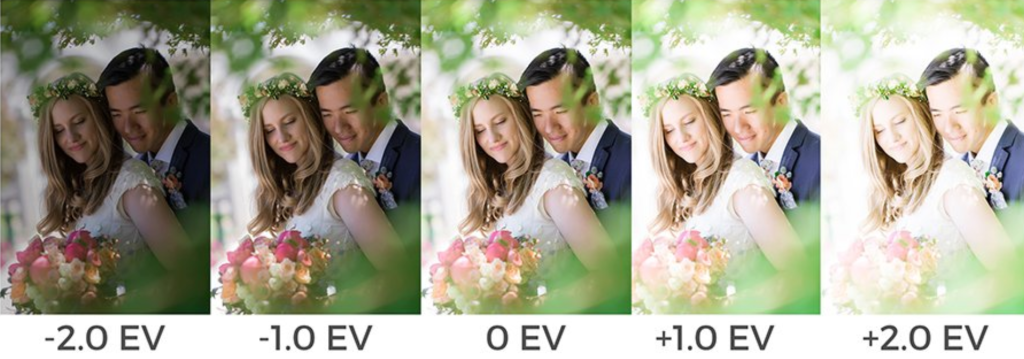
- Take the same photo using different EV settings. This helps you see how changing exposure values affects brightness and mood.
- Check your camera’s histogram. It shows how light or dark your photo is and can help you spot if your image is too bright or too dark.
- Start with EV compensation. If you’re not ready for full manual mode, use the EV (+/-) setting on your camera or phone to make small changes and see what happens.
- These tips are great for beginners and will help you feel more confident with your camera. Just keep practicing, and you’ll get the hang of it!
Common Mistakes that Occur
- Photos that are too bright or too dark: This happens when your EV setting doesn’t match the lighting. For example, using outdoor settings inside can make your photo too dark.
- Not adjusting EV when lighting changes: If you go from sunny to shady or indoors without changing your settings, your photo may not look right.
- Ignoring the EV meter or histogram: Your camera has tools to help you check brightness before you snap the photo. Use them!
- Forgetting about ISO: Some beginners only adjust shutter speed or aperture and forget that ISO also affects exposure.
- Guessing instead of using a chart or guide: EV charts or apps are helpful! Don’t just guess- use them to get the right setting for your scene.
Conclusion
I know learning about EV (Exposure Value) can seem tricky at first, but it gets easier the more you try it.
EV just helps you understand how bright or dark your photo will be, based on your camera settings.
In this guide, I showed you what EV means, how to use it with charts or formulas, and how it connects to things like shutter speed and aperture.
You don’t have to be a pro to get the hang of it. Start by using EV charts, try different settings, and look at how your photos change.
I’ve made mistakes too—and that’s how I learned the most!
Remember, it’s okay to experiment. The more you play with your camera, the better you’ll understand how to get the look you want.
Keep practicing, have fun, and soon you’ll be using EV like a pro. You’ve got this!

Leave a Reply