Do you want to learn how to fly a drone? You can find the gadget in practically every professional photographer.
People have discovered drones’ incredible capacity to record beautiful cinema from previously unthinkable perspectives.
If you are a professional or creative photographer or are just intrigued by flying camera drones and want to make it a hobby, we have you covered!
This guide will help you understand essential insights, technical concepts, and practical guides for beginner beginners flying a camera drone.
Before we start on how to fly a camera drone, let’s review its technical aspects and learn the vocabulary so you aren’t confused. Don’t worry—it’s not that hard!
Understanding a Camera Drone
Have you ever used a gaming controller? A controller allows you to control every aspect of the game, and the same can be said for a drone.
A controller controls a drone, and it has numerous operations.
To keep things easy, we’ll go over the controls of a camera drone with basic settings.
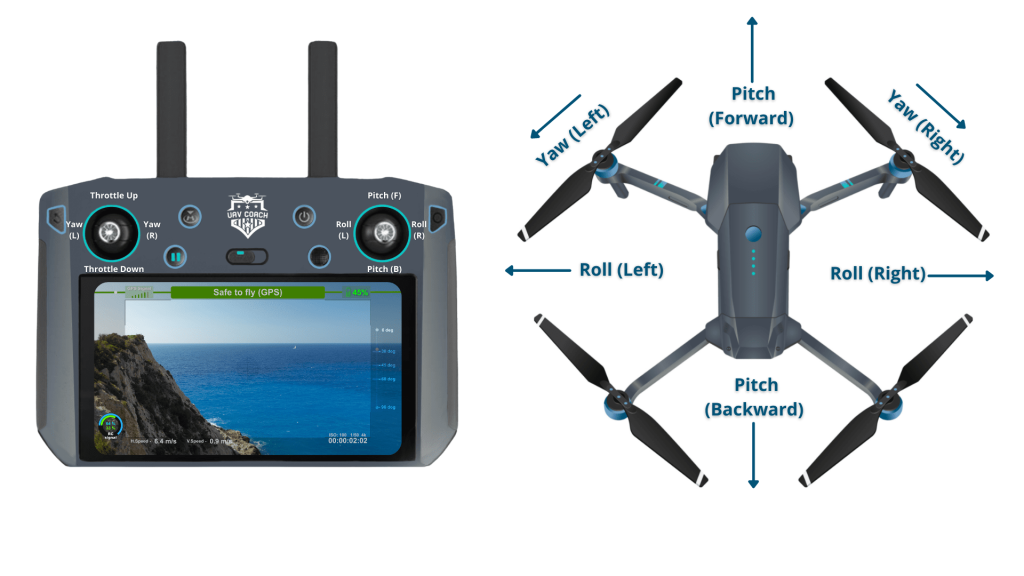
When you look at the controller, you’ll notice it has two joysticks. One to the left and one to the right. These joysticks perform the main controls of a drone.
The Left Joystick
A drone controller’s left joystick executes all functions that can be performed from a fixed place.
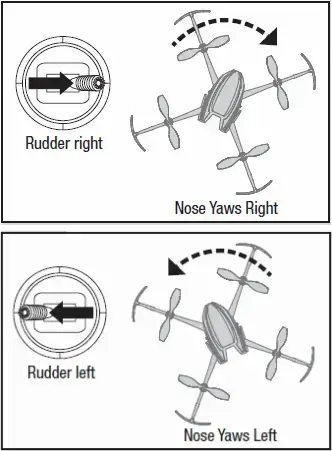
While you can’t steer a drone in any direction with the left joystick, you can execute Yaw and Throttle operations.
Throttle
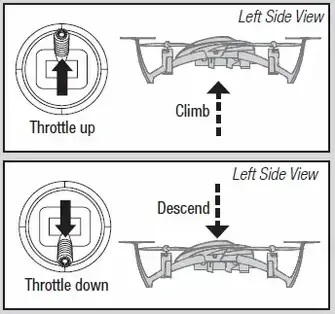
Imagine your camera drone is positioned at coordinates (x,y) in a two-dimensional plot. To adjust the y-coordinate, you need to shift the left stick forward or backward. These are known as throttle operations.
Simply put, if you want to modify your drone’s altitude or height, push the left stick up (throttle up), and the drone will rise to the sky. Push the left stick down (throttle down), and the drone will descend.
Yaw
The Yaw rotates your drone at a set position to capture all angles. That is, pushing the left stick to the left causes the drone to pivot on the axis to the left while pushing the left stick to the right causes the drone to pivot to the right.
So, the left joystick holds you in place and covers all angles from all directions and altitudes, but it doesn’t move in any direction.
The Right Joystick
The right joystick on a drone controller allows you to navigate the drone in any direction; it moves your perspective. This is accomplished by using the controller to perform Roll and Pitch actions.
Roll
Just as the name suggests, a roll is performed on the right joystick by pushing the stick to the left or to the right to literally roll the drone to the left or right, respectively.
When you push the right stick to the left, the drone angles diagonally downwards to the left, and when you push the right stick to the right, the drone angles diagonally downwards to the right.
This occurs because when you move the right stick to the left or right, the propellers push the air in different directions, pushing the drones to fly in the direction you moved the right stick.
Pitch
Pitch is performed on the drone’s controller by pushing the right joystick forward or backward. This is done to advance or reverse the drone. Pushing the right joystick forward causes the drone to pitch up, causing the air to push the drone ahead.
When you pull the right joystick rearward, the drone pitches up, causing the air to push the drone backward.
So, when you execute a roll, you can roll the drone to the left or right, and when you execute the pitch, the drone will move forward or backward.
Throttle, Yaw, Roll, and Pitch are the operations performed by the left and right joysticks. The combination of the camera drone’s joysticks will cause the drone to move in the desired directions and capture all of the different viewpoints.
Important Factors to Consider to Operate a Camera Drone
We’ve covered all you need to know about the controls and operation of camera drones for beginners. However, there are several things you should think about before flying your drone.
Let’s check them out!
1. Fly Your Drone in a Secure Area
Before you try out your new camera drone, make sure that you are flying it in a secure area. Landscapes are the perfect places for you to fly the drone. There are no buildings to make flying difficult, and you get to capture beautiful views. So, choose big, wide, and open areas and make sure that it is legally allowed to fly a camera drone there.
2. Never Fly Closer Than Five Miles to an Airport
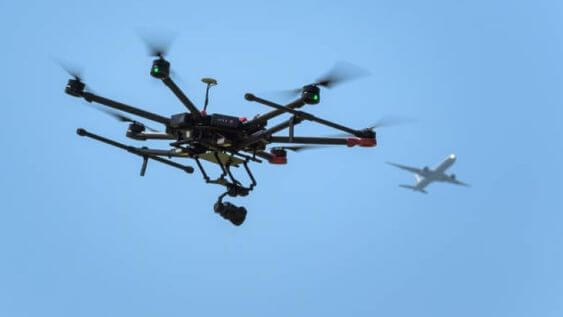
Flying a drone within five miles of an airport is absolutely prohibited. Drones can cause significant damage to aircraft, possibly resulting in deadly situations for both the aircraft and its passengers.
3. Never Fly Higher Than 400 feet
This is a common rule for flying drones for a wide range of reasons. You may be tempted, especially if you are flying outside of the restricted zones, but depending on where you are recording, flying your camera drone above 400 feet can endanger both wildlife and your drone.
Also, never allow your drone to fly out of your visual sight lines; this can happen if it reaches 400 feet. While flying your drone, keep distance and weather conditions in mind.
All Set and Go!
That’s all there is to it, guys! I hope you found this post useful and that you are now ready to fly your camera drone. Just practice as much as you can to get accustomed to the controller.
Capturing spectacular visuals with a drone camera can be an exciting experience, and you will undoubtedly wow your clients or friends. Just don’t fly above a crowd of people and intrude on their privacy for obvious reasons!
Let us know about your flight!



Leave a Reply